Access collaborative shared files off-campus or wirelessly that are located on ILR servers.
1. Access Cisco VPN
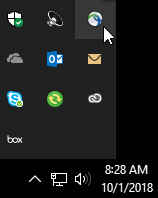
On the bottom right hand side on the desktop, click on the up arrow (near the clock) then select Cisco AnyConnect. The icon will look like a small globe.
Alternatively, if the Cisco AnyConnect icon is not available after clicking on the arrow, you can find it by clicking on the Start menu  on the far left hand side on the desktop. After clicking on Start, scroll down the alphabetical list and find Cisco -> Cisco AnyConnect Secure Mobility Client. If your device does not have the Cisco VPN client, you can download and install it by clicking here. Please note that you will need an administrative rights account to install Cisco AnyConnect on your device.
2. Connect to VPN
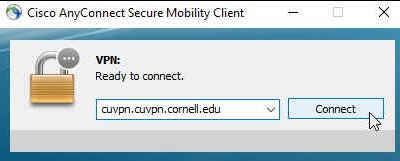
The Cisco AnyConnect Secure Mobility Client pop-up box will appear. To the left of Connect, verify that cuvpn.cuvpn.cornell.edu is entered. If it is, click Connect.
3. Login to Two-Step VPN
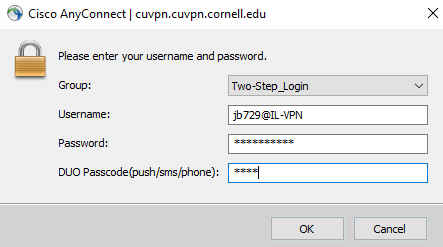
A dialog box will appear with the heading Cisco AnyConnect | cuvpn.cuvpn.cornell.edu. Use the following options to connect (select OK when all fields have been entered):
Group = Select Two-Step_Login from the drop down menu.
Username = yournetid@IL-VPN (this is case sensitive so use capital letters for IL-VPN).
Password = your netid/email password.
DUO Passcode(push/sms/phone):
push: When typing push, a notification will be sent to your DUO Mobile app on your Smartphone.
sms: When typing sms, ten unique sets of numbers will be sent via text message to your Smartphone. Any of these codes can be used for twenty-four hours. Each code can only be used once.
phone: when typing phone, the default phone number setup in your two-step device management will ring to verify your identity.
4. Successful Connection Verified
The Cisco AnyConnect connected pop-up box will appear on the bottom right on your desktop verifying you’ve successfully connected to Two-Step VPN.

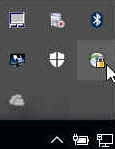
To double-check you’re still connected to VPN, click on the up arrow on the bottom right near the clock and look for an image of a lock over the top of a globe.
5. Add Shared Folders
***IMPORTANT*** The below instructions will only work for an ILR issued computer. If you're using a personal Windows device to attempt to access ILR files and folders, please follow the VPN and Remote Desktop instructions to connect to your ILR campus computer. Your personal Windows device will act as a gateway to connect to and logon to your ILR campus computer.
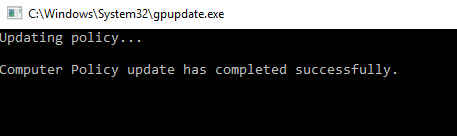
Now that you're connected to the Cornell network via VPN, you're ready to connect to the server folders you have access to. On the bottom left, on the desktop, type gpupdate within the Search Windows box (to the right of the Start menu  ) and select Enter on the keyboard. Please note that there may be a magnifying glass to the right of the Start menu rather than a box that says Search Windows. If you see the magnifying glass, click on it and type gpupdate then select Enter on the keyboard. A black box will appear for a minute or so, then disappear after stating that the computer policy update has completed successfully.
6. Access Shared Folders
Click on the manilla folder (File Explorer) on the bottom left hand side on the desktop. Then select This PC on the left hand side. You should see all your shared folders on the right.
**Please note*** If you don't see your shared folders after running gpupdate and clicking on This Pc in File Explorer(when you clicked on the manilla folder), please go to step 7, which has an alternative method of accessing shared folders.


7. Alternative For Shared Access
In Windows Explorer (where you originally clicked on the manilla folder), to the right of the folder at the top left, type in \\files.cornell.edu\il\data\shared and select Enter on the keyboard. After a short delay, your shared folders should be visible below.

8. Disconnect from VPN
When you're finished working on the Cornell network and want to disconnect from VPN, select the up arrow on the bottom -> Choose the globe icon -> Disconnect.
