Below are instructions to add an ILR printer to a personal owned Windows 10 computer using the printers IP address. Please contact tech services if you dont have the IP address of the Konica you need. Desktop Support Request
Please note that you will need to be connected with a network cable or WiFi Internet connection to Eduroam in order to print to the Ithaca ILR printers.
1. Download and Extract Print Drivers
Go to the printer manufacturer website. Download & extract the printer driver software to a location that's easily accessible on your device (downloads, desktop).
HP Printer - Click on Software and Drivers -> enter printer name under Enter your HP product name (example - laserjet 400m) -> select Find. Expand the + next to the Driver-Universal Printer Driver heading -> Download. Locate the file - right click -> Extract All.
Konica Printer - Type in the Konica model (example - Bizhub 368) -> select magnifying glass to search for the model printer driver. Select Drivers tab, PCL tab for Windows 10 -> choose the file with a .zip extension (example of what the name will look like (C554 C364_Series_Win10_PCL_PS_FAX_v5.1.x.0.zip) at the end -> OK (to download). Locate the file -> right click -> Extract All.

2. Go Into Devices and Printers
On the desktop, to the right of the Start Menu  in the Search Windows box (or magnifying glass), type devices and printers. Select Devices and Printers when it appears above the Search Windows box.
***Please note, you can also find Devices and Printers within the Control Panel. To find Devices and Printers through the Control Panel, type Control Panel in Search Windows, Select Control Panel -> Devices and Printers.***

3. Select Add a Printer
Within the Add a device dialog box, click Add a printer -> The printer that I want isn't listed.

4, Add Printer by TCP/IP Address
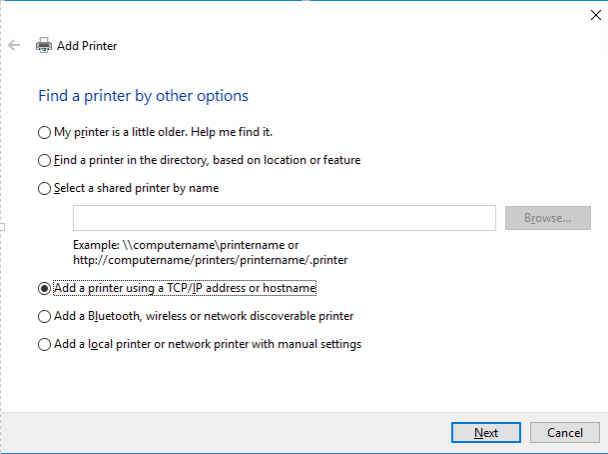
5. Add IP Address
To the right of Hostname or IP address -> enter IP address of the printer you would like to add. No adjustments need to be made to the Port Name entry -> Next.

5. Locate Downloaded Driver
The dialog box - Install the printer driver will appear. Select Have Disk.

6. Browse and Select Print Driver
Select Browse -> locate the print driver you downloaded and extracted -> select the file that appears to the right of File name (the necessary file to install the printer) -> click Open -> OK.
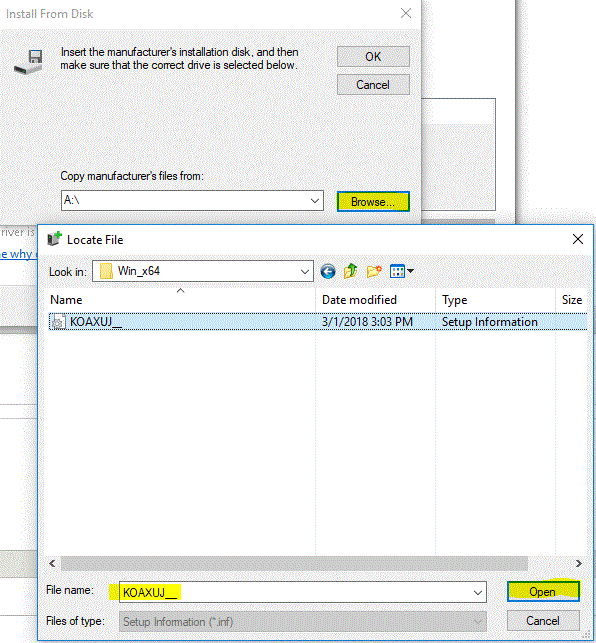
The path to the file you want is located wherever you downloaded and extracted it too, this is an example to follow. C:\Users\Your Name\Downloads\C554_C364_Series_Win10_PCL_PS_FAX_v5.1.x.0\Driver\Drivers\PCL\EN\Win_x64

7. Specify Printer Model
One or several printers that the print driver will work with should appear. Choose the printer that you have from the list -> Next.

If you have a 267, then choose the next number up in the same series, for instance 367. Another example if you have a 264 then pick 364.
8. Name Printer
A default name of your newly installed printer will appear. You can change the name or keep the default name provided.

9. Install Print Driver
Select Install to install the print driver.

Do Not share the Printer

10. Verify Success
Click Print a Test Page to ensure print driver install properly. Also, you can select Set as the default printer, if applicable -> Finish.

If the test print fails, make sure you are connected to the wired network or on the Eduroam Wireless network.
If your test print fails, although it appears to look like it printed from your computer, but is not in the tray at the printer.
Go into Printers & Scanners, select manage on the printer you installed.

Select Printer Properties, then select the configure tab and scroll down to account track and change the setting to disabled.
