Description
Note: This article only applies to employees in the CCE Steuben County.
This article describes how Cornell Cooperative Extension (CCE) Steuben County staff can print to the Konica Minolta Bizhub C650i copier, set default print preferences, use the Secure Print feature, and install the printer driver.
Note: Department print codes are not used on this copier.
- Current Konica Model: Konica Minolta Bizhub C650i
If you need this printer installed on your computer, contact your local IT contact.
Setting Default Print Preferences
- Open the Windows search bar.
- Type Printers & Scanners and press Enter to open the settings.

- Click on the Konica printer you want to configure.
- Select Manage.
- Click Printer Preferences.
- Click the My Tab tab.
- Under Print Type, select your preferred default: 1-sided or 2-sided printing.
- Click the Quality tab.

- Under Select Color, select Gray Scale.
- Click OK to save and close the Printer Preferences dialog box.
If you have any trouble with these settings, please open a Service Request.
Using Secure Print
Secure Print assigns a document ID and password to print data and saves it to the Secure Print User Box on the copier. The document is not printed until you enter the ID and password at the copier, which prevents printed materials from being left unattended, mixed in with other documents, or printed on the wrong paper. This feature is particularly suitable for safely printing confidential documents. For more information, see: Print (konicaminolta.us)
Why use Secure Print?
- Protects confidential documents from risk of exposure.
- Reduces unnecessary trips to the copier and prevents documents from being shuffled in with others or printed on the wrong paper.
At the Computer
Note: Before beginning, decide on a Secure Print ID and Password. You can set these to anything you choose. You will need both values to retrieve the document at the copier.
- Open the file you want to print in the application.
- Click File in the menu bar.
- Click Print.
- Select the Konica copier from the printer list.
- Click Printer Properties or Properties.
- Note: The option name may vary depending on the application you are using.
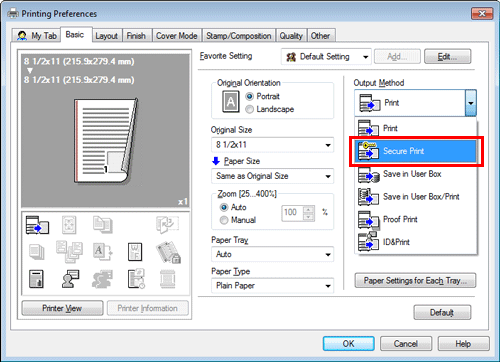
- Click the Basic tab.
- In Output Method, select Secure Print.
- Enter your Secure Print ID and Password.
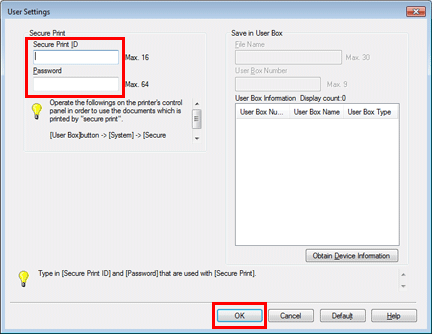
- Click OK to close the Secure Print ID and Password dialog box.
- Click OK to close the Printer Properties dialog box.
- Click Print.
At the Copier
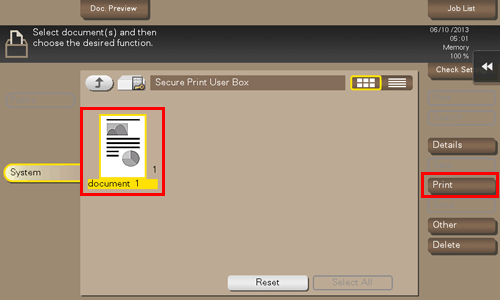
- Tap User Box on the copier screen.
- Select Secure Print from System.
- Enter the ID and password for your secure print document.
- Tap OK.
- Select the secure print document you want to print.
- Tap Print.
- If needed, change the print settings.
- Press the Start key on the Control Panel.
Note: After printing, the secure print document is automatically cleared from the Secure Print User Box.
Installing the Konica Copier Driver (IT Staff)
- Download the printer drivers from the Konica website.
- Alternatively, download a copy of the recent driver from X:\ITStuff\Copier-drivers.
- Extract the downloaded file.
- Run the setup.exe file.
- If the installer does not detect the printer automatically, select Specify Manually and enter the printer's IP address.
- After installation, change the default preferences to black and white. Refer to the Setting Default Print Preferences section above for instructions.
- Test printing to confirm the installation was successful.